Run your bot 24/7
Your bot only works while a computer is running it. If you run it on your own PC, it stops when the PC is off or asleep. This guide shows the easiest way to keep it online all the time, with no coding and no typing commands. Everything happens in your web browser.
Prices and limits checked October 2026. Hosting companies change their prices, so check their page before you sign up.
Our recommended path: GitHub + Render
- Cost: about $7.25 a month, paid to Render, not to us ($7 for the smallest always-on server plus about $0.25 for 1 GB of storage that remembers what the bot already posted). Render needs a credit or debit card.
- Time: 20–30 minutes to put it online 24/7 the first time. (Just running it on your own PC takes about 5 minutes.)
- Why Render: our bots already include a setup file for it (
render.yaml), so Render fills in most of the settings for you. - Why not free? Render's free plan is only for websites and goes to sleep after 15 minutes without visitors, which would knock a Discord bot offline. Always-on bots need the paid plan.
✅ Tested Oct 16, 2026: we followed these exact steps with a new GitHub and Render account and the Gaming Community Kit. The bot went live and answered /rules in Discord. Websites change their buttons from time to time, so if something looks different, email hello@getbotdrop.com.
Before you start
Unzip the file you downloaded from Gumroad. Inside is one folder (for example 09-discord-gaming-community-kit). Open its README.md to see which settings your bot needs. There are two kinds:
- Bots that reply to commands (Gaming Community Kit, Mod Bot) need a bot token. A token is like a password that lets your bot log in to Discord. Never share it.
- Alert bots (Deal Alert, Free Games Radar, Patch Tracker, Player Count, Stream Alert and others) only need a webhook URL. That's a private web address that lets the bot post into one channel.
How to get a Discord bot token (command bots)
- Go to discord.com/developers/applications and log in with your Discord account.
- Click New Application, type your bot's name, tick the box to agree, and click Create.
- Click Bot in the left menu. Here you can set your bot's picture and name.
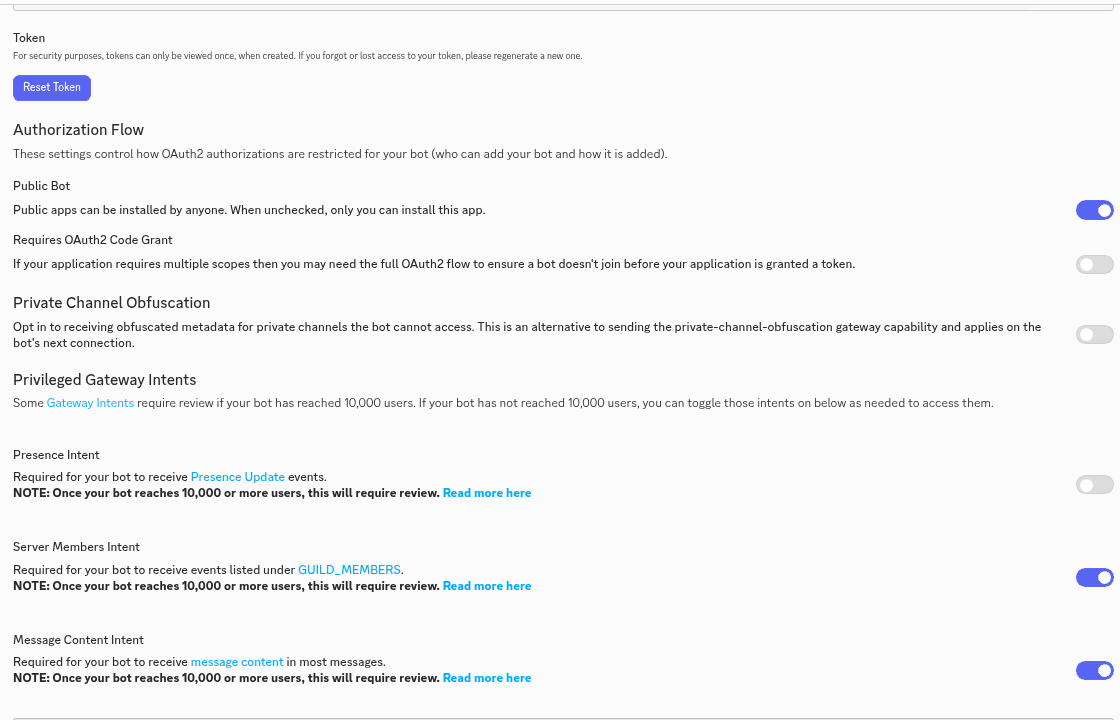
- Scroll to Privileged Gateway Intents, switch on Server Members Intent and Message Content Intent, and click Save Changes. Our command bots need both.
- Scroll back up and click Reset Token, then Copy. Paste it somewhere safe for now. Discord only shows it once. If you lose it, just reset it again.
- To add the bot to your server, click OAuth2 in the left menu, then URL Generator. Tick bot and applications.commands, then tick the permissions listed in your bot's README. Copy the link at the bottom, open it, and pick your server.
- You'll also need your server ID (
GUILD_ID). In Discord, open User Settings → Advanced and switch on Developer Mode. Then right-click your server's icon and click Copy Server ID.
How to get a webhook URL (alert bots)
- In Discord, hover over the channel where alerts should appear and click the ⚙️ (Edit Channel).
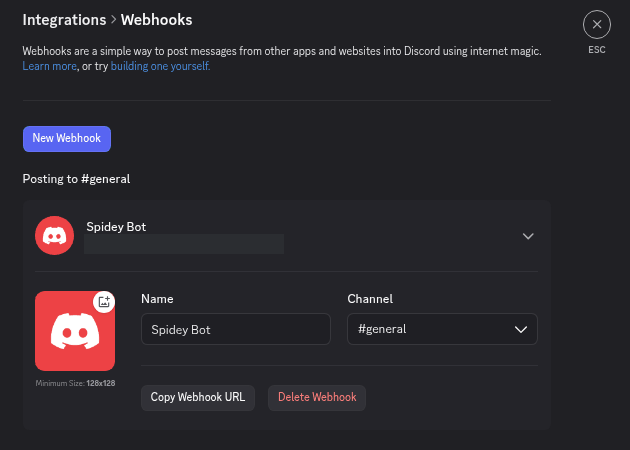
- Click Integrations, then Webhooks, then New Webhook.
- Give it a name and picture if you like, then click Copy Webhook URL.
Put your bot online, step by step
- Make a free GitHub account at github.com/signup. GitHub is where your bot's files will live, so Render can find them.
- Create a private repository (a "repository" is just a folder on GitHub). Go to github.com/new (or click the + at the top right, then Create new... → New repository). Name it, for example
my-discord-bot. The visibility choice starts on Public, so change it to Private. Then click Create repository.
Keep it Private. Your license doesn't allow sharing the template publicly.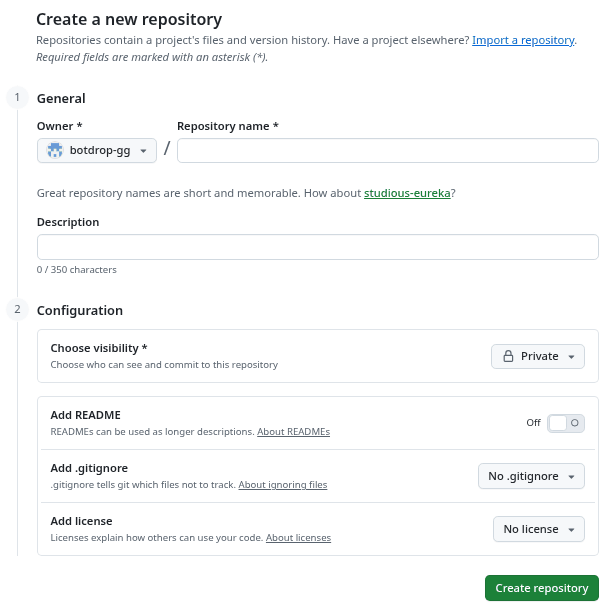
- Upload your bot's files. On the new repository page, click uploading an existing file (or Add file → Upload files). Open the unzipped folder on your computer, select everything inside it (not the folder itself), and drag it onto the page. Then click Commit changes.
Check it worked: you should seerender.yamlandDockerfilein the main list, not inside another folder.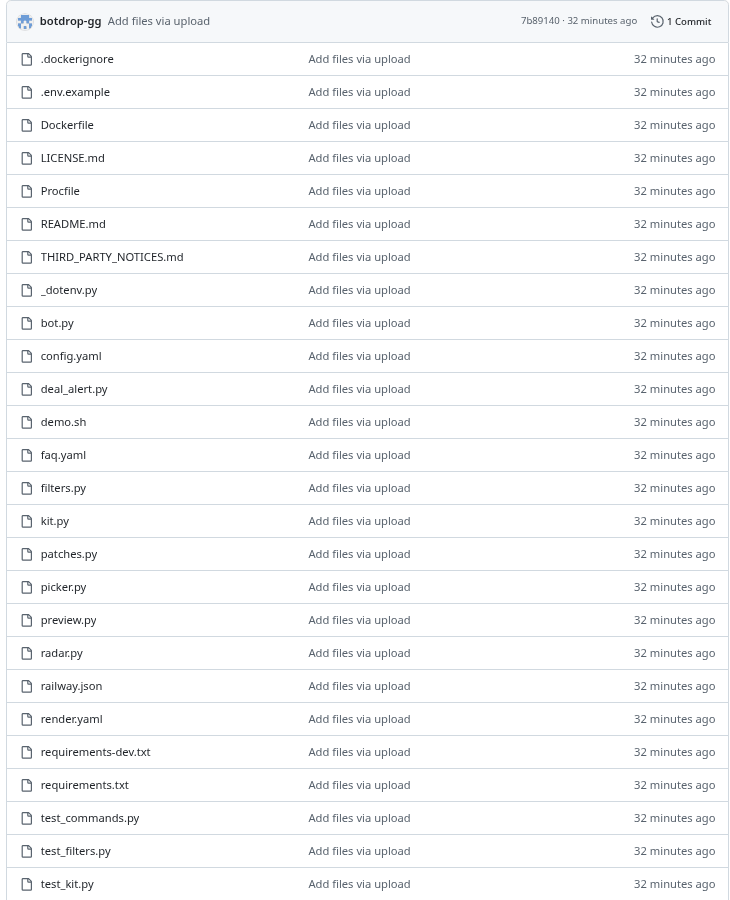
- (Optional) Change the bot's settings. Click
config.yaml, then the ✏️ pencil icon, and edit things like which games or channels to watch. Your README explains each line. Click Commit changes when you're done. - Make a Render account at render.com. Signing up with GitHub is easiest.
- Create the bot on Render. In the Render dashboard, click + New, then Blueprint.
- Render first shows an Add Card window. Enter your card. Render places a temporary $1 hold to check the card. It is not charged.
- Render asks to install its app on GitHub. Choose Only select repositories, pick your bot's repository, and confirm. GitHub may ask you to Confirm access. If it does, choose Verify via email and type in the code GitHub emails you.
- Back on Render, your repository appears in the list. Click Connect next to it.
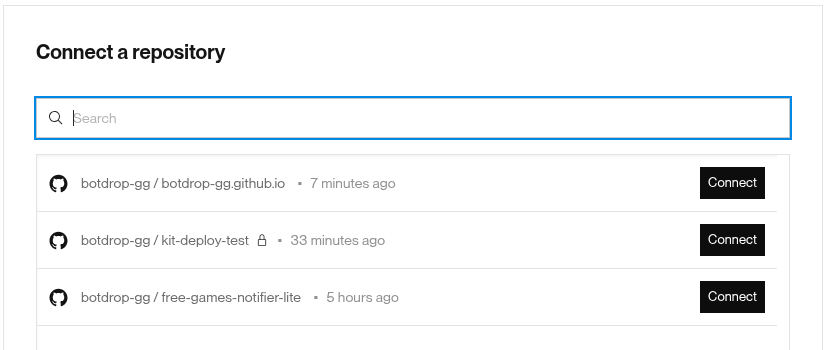
- Paste your secrets. You'll see a form with a Blueprint Name (any name is fine) and Branch (leave it on
main). Render readsrender.yamland asks you for the settings it needs, likeDISCORD_TOKENandGUILD_ID, orDISCORD_WEBHOOK_URL. These are called environment variables, which just means settings stored on Render instead of inside your files. Paste each value. Leave optional ones (like AI keys) blank if you don't use them. - Click Deploy Blueprint. The form lists something like "Create background worker … (Starter)". It doesn't show the price, but Starter is Render's smallest paid plan, $7 a month, plus about $0.25 for the 1 GB disk. Render builds your bot. In our test it was live within a minute.
- Check it's alive. Open your new service in Render and click Logs. Look for Your service is live. Command bots then print Logged in as followed by your bot's name, and alert bots print what they checked (for example "No new uploads or streams"). Your bot now shows as online in Discord. Try a command like
/rules.
Changing settings later: edit config.yaml on GitHub (step 4). Render notices and restarts the bot by itself. To change a token or webhook, open the service in Render and click Environment.
Common problems
"Improper token has been passed" in the logs
The token is wrong or was reset. Get a new one (Reset Token in the Discord Developer Portal), then paste it in Render under Environment and save.
The bot is online but ignores commands or doesn't see messages
Switch on Server Members Intent and Message Content Intent on the Bot page, and make sure you invited it with applications.commands ticked. Slash commands can take a minute to appear. Check that GUILD_ID is your server's ID.
Render says it can't find render.yaml or a Dockerfile
You probably uploaded the folder instead of what's inside it. In GitHub, your files should be at the top level. Delete the repository and upload again, selecting the files inside the folder.
Render asks for a card, or says workers aren't free
That's expected. Background workers (always-on bots) need Render's smallest paid plan, about $7 a month.
Alerts don't arrive
Check the webhook URL is pasted in full (it starts with https://discord.com/api/webhooks/) and that the webhook still exists in the channel's settings. Alert bots check on a timer (for example every 6 hours for Free Games Radar), so the first post can take a while. The first run may only record what already exists, so you don't get flooded with old posts.
The bot posts old alerts again after a restart
Keep the 1 GB disk that render.yaml adds. It's where the bot remembers what it already posted.
Other options (for advanced users)
Prices and limits from each company's official page, checked October 2026. Some need typing commands.
| Option | Cost | Good for a 24/7 Discord bot? |
|---|---|---|
| Your own PC | Free | Only while the PC is on and awake. Great for testing. |
| Raspberry Pi or an old always-on computer | Cost of the device, plus a little electricity | Yes, if it stays on and connected. Needs some setup with Docker or Python. |
| Render background worker | From $7/month (+$0.25/GB disk) | Yes. This is our recommended path above. There's no free worker plan. |
| Render free web service | Free | No. It sleeps after 15 minutes without web visits, wipes local files on restart, and has no disks. It's fine only for our two web tools (Review Verdict, Repo Health), and they'll take about a minute to wake up. |
| Railway | Trial: one-time $5 credit for up to 30 days. After that, the Free plan gives $1 credit a month, or Hobby is $5/month (includes $5 of usage) | Yes on Hobby. A small bot often fits in the included $5, but you pay for what it uses. The Free plan's $1 likely won't cover a full month. Our bots include railway.json. |
| Oracle Cloud Always Free | Free (card needed to sign up) | Yes, but it's the hardest to set up. You manage a Linux server yourself, free servers can be "out of capacity", and Oracle may reclaim servers it considers idle (very low use over 7 days). |
| fly.io | No free tier. A short trial, then from about $2.19/month for the smallest always-on machine | Yes, and cheap, but setup uses a command-line tool. We don't ship a fly.toml yet. |
| Cheap VPS (a small rented Linux server) | Usually a few dollars a month | Yes. Install Docker, then run the bot as the README shows. You handle updates and security. |
Files included in every bot
Dockerfile (runs anywhere Docker runs), render.yaml (Render Blueprint: a worker on the smallest paid plan with a 1 GB disk at /data, or a free web service for the two web tools), railway.json (Railway: builds the Dockerfile and restarts on failure), and a Procfile (for hosts that read one, for example worker: python bot.py). For Railway, create a project from your GitHub repo, add the same settings under Variables, and add a volume mounted at /data so the bot remembers what it posted.
There's no one-click "Deploy" button, because your copy lives in your own private repository. The steps above take its place.
Sources: Render free plan, Render pricing, Railway plans, Railway trial, Oracle Always Free, fly.io pricing.